
The Complete Hampshire Resin Method

The Best Resin Installation Process

The right resin installation process shapes how strong, smooth and consistent the final surface becomes.

This 12-step resin installation process shows how each project moves from early ideas to the final, hand-trowelled surface, with every detail handled transparently, skilfully and with care.

Tap the InstaBrochure™ button to request the Hampshire Resin Method luxury brochure.

When Hampshire Homes Began to Shine Again

Resin driveway framing a Hampshire country house

Across Hampshire, resin surfacing has quietly stepped into a new era. Once a practical alternative, it is now the hallmark of considered design, seen in Winchester’s Georgian courtyards, Alresford’s period driveways and the modern terraces overlooking the Solent. From Farnham’s leafy suburbs to Petersfield’s rural retreats, the best resin installation process brings coherence, warmth and polish to the spaces that frame the home.

Presentation matters. Homes are expressions of care and character, and the spaces around them deserve the same attention as the rooms within. The resin installation process used plays a crucial part in that outlook, delivering design with purpose, elegance without excess and strength that can be felt beneath the feet. In a county where every home tells a story, this is the surface that quietly completes it.

The Hampshire Resin Method

From first idea to flawless finish, each stage of the resin installation process protects the property, the investment and long term peace of mind.

Consultation and site assessment capturing usage, levels and drainage

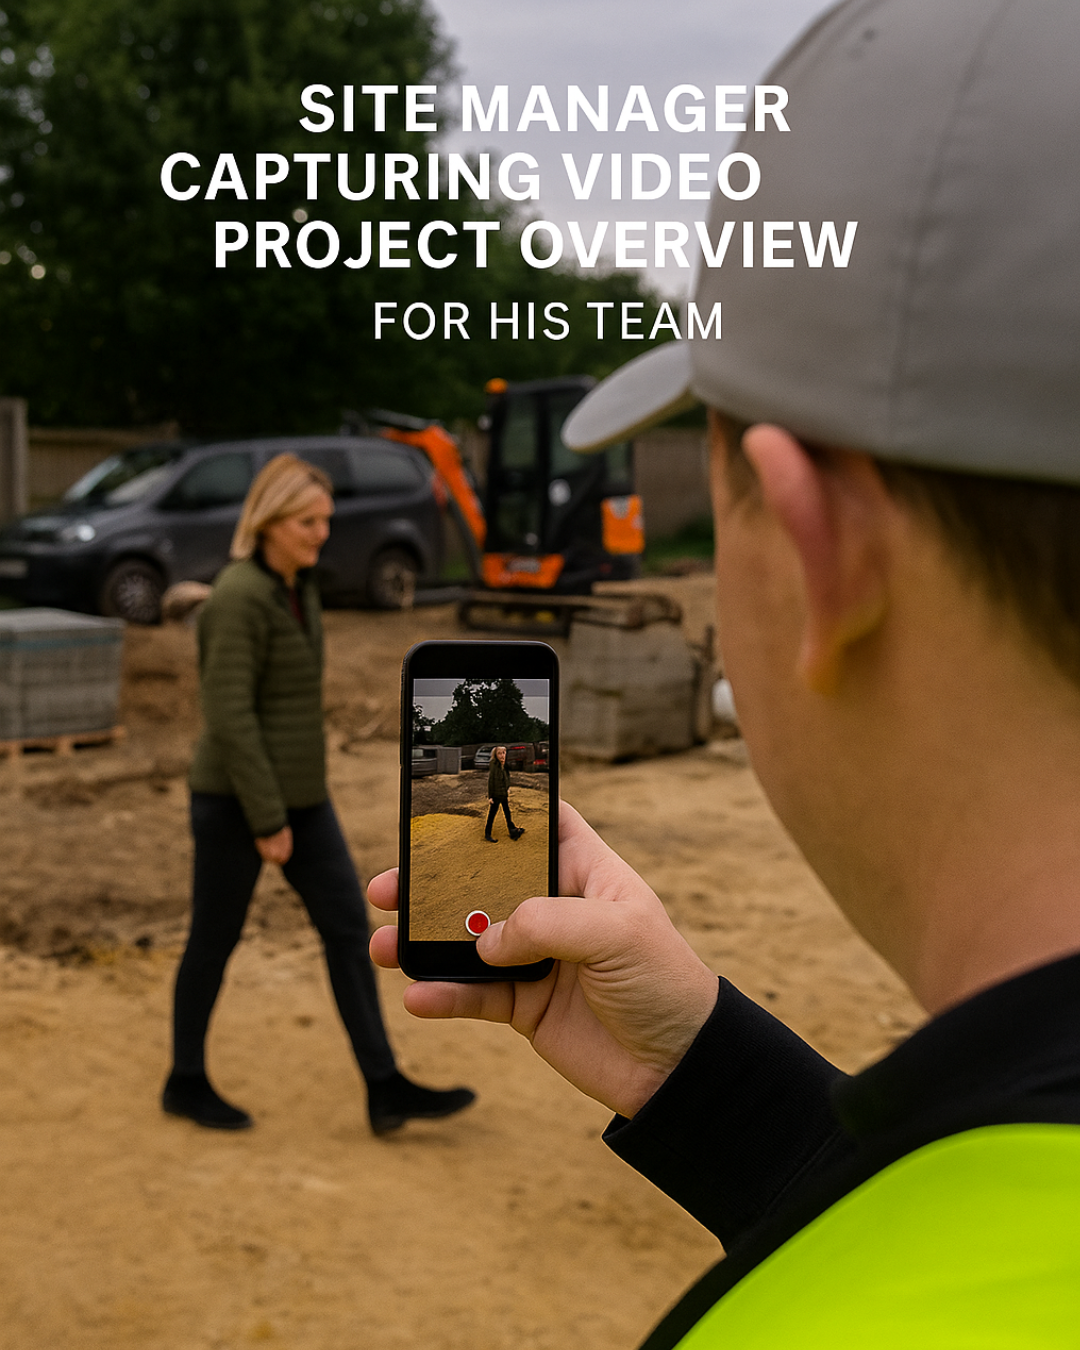
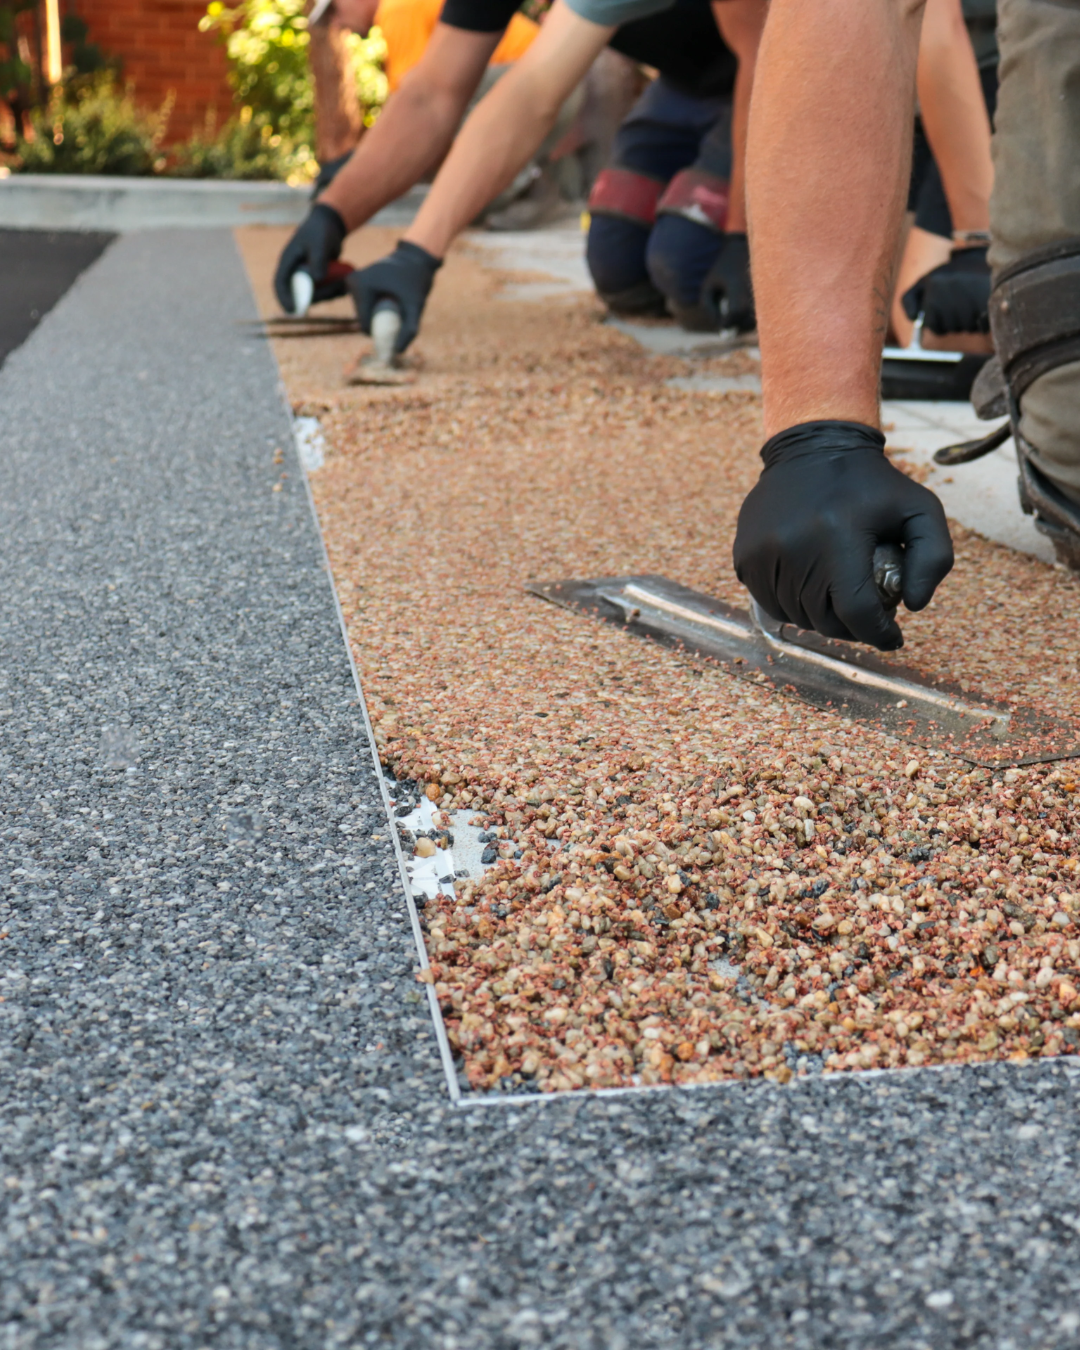
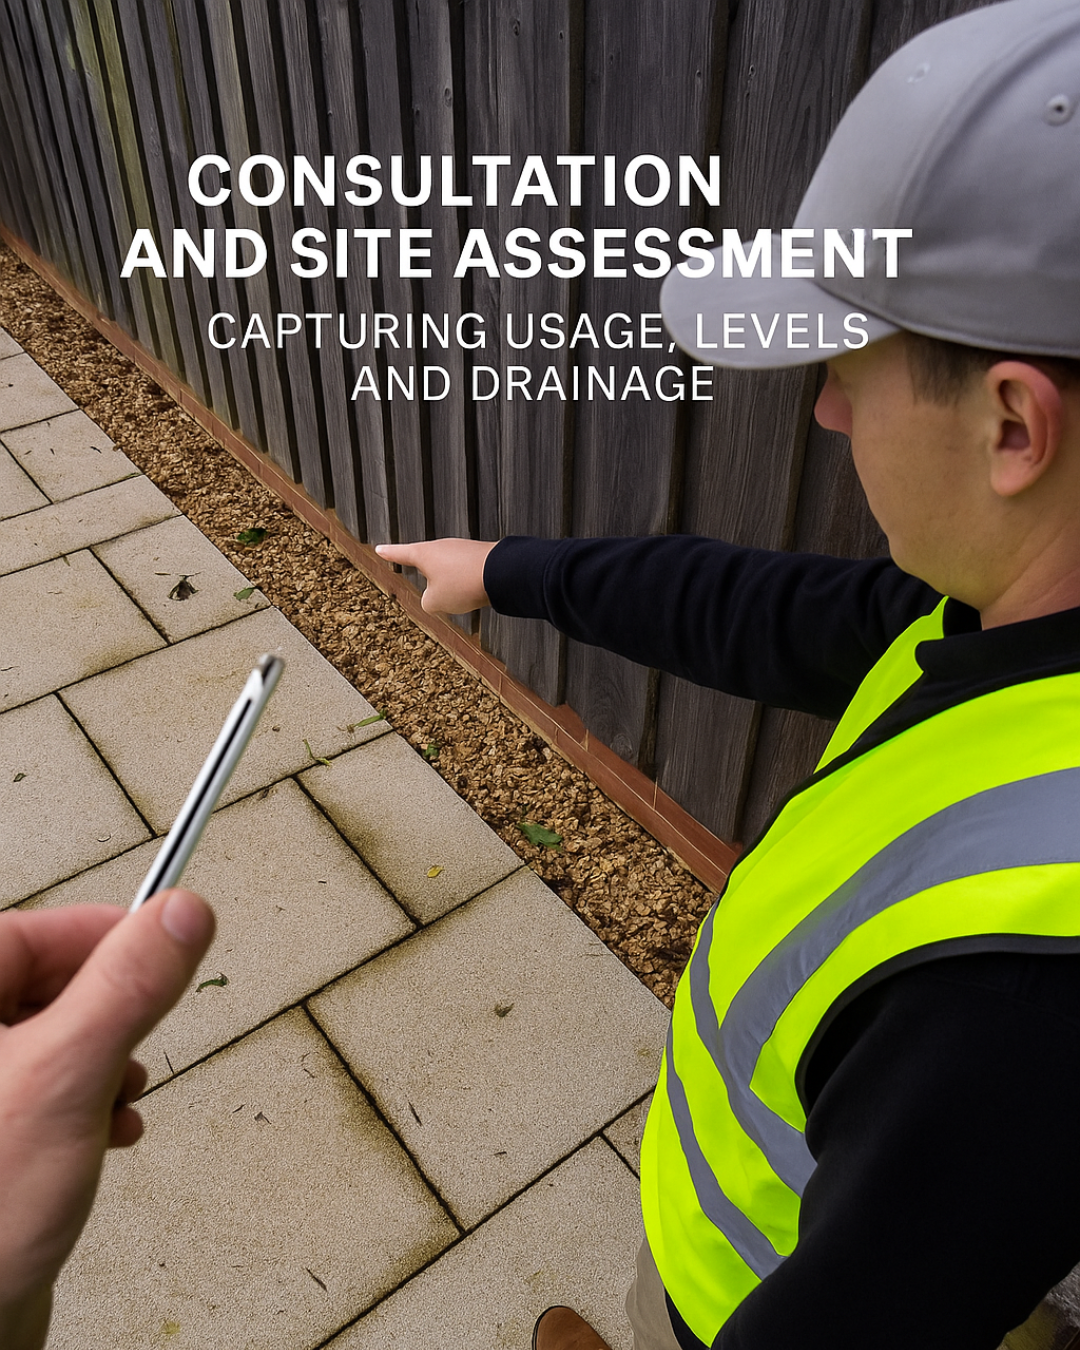
1) Consultation & Site Assessment

The resin installation process begins with a calm, thorough look at the space. A site manager notes how vehicles park, how people walk across the area, where water currently gathers and how light falls across the front or back of the property.

Usage, levels and drainage are recorded carefully so that the design suits real life, not just a brochure picture. Shared notes often include ideas from the resin versus traditional surfaces guide to help narrow the options early.

2) Walk-Around & Video Briefing

A detailed video walk-around is recorded so the resin surfacing installation team can see the exact layout before arrival. Key access points, drainage runs, steps and door thresholds are captured, along with any areas where cars or delivery vans turn tightly.

This simple step prevents surprises on resin installation day and allows questions to be raised in advance. Homeowners often find that watching the video back gives a fresh way of looking at the space as a whole, rather than as separate driveway, path and patio areas.

On site wisdom: when an old soakaway appeared during levelling, the base layout adjusted that same day. Drainage improved and the final finish stayed perfectly even.

Site manager capturing a video overview for the team
Drone or smart app survey with 2D planning

3) Planning, Survey & Visual Mock Ups

Larger or more complex plots benefit from measured surveys using a drone or smart app. A 2D plan confirms exact boundaries, gradients and edging lines so that the resin surface feels naturally aligned with existing walls, lawns and beds.

Visual mock ups show the chosen blend and edging against the actual property, which is especially helpful for family decision making. Before and after sliders on the See What’s Possible page provide extra inspiration for layout ideas.

4) Quote, Documents & Approvals

A clear written quotation sets out the agreed layout, base build and resin system in plain language. Warranty details, insurance certificates and terms sit alongside the quote so every part of the proposal is easy to scan.

This stage is a good time to revisit the homeowner resources hub and check base build diagrams or SuDS information against the proposal. Any remaining questions on the resin installation process can be listed before giving a formal approval.

Transparent quotation with warranties and terms supplied
Save the date confirmation for the groundbreaking date

5) Save the Date Confirmation

Once the quote is accepted, an installation window is booked and confirmed in writing. In busier months this often sits several weeks ahead, which allows plenty of time to plan parking, access and any garden tidy ups.

Many households treat this as a milestone, lining up other home projects around the same period. A clear date in the diary removes uncertainty and allows family members and neighbours to be kept in the loop.

6) Style Matching & Material Selection

Resin blends, edging and finishes are chosen to suit brickwork, roof colour, window frames and planting. Samples are viewed next to the property at different times of day so that the chosen blend looks as good in soft evening light as it does at midday.

A curated sample pack from the Choose My Finish page makes this stage easier. Blends can be compared side by side, and it often becomes obvious which one feels right for the style of the home.

Comparing resin samples against brick and planting
Base preparation with permeable sub base and edging restraints

7) Base Preparation

Longevity begins beneath the resin. Existing surfaces are broken out or checked carefully, levels are set and an appropriate sub base is compacted for either permeable or non permeable designs, depending on the agreed drainage plan.

Edging restraints, recessed covers and thresholds are aligned so that everything sits neatly once the resin is laid. The base build resources explain what happens under the surface and give extra assurance that the preparation is doing the quiet heavy lifting.

8) Cleaning & Priming (if overlaying)

Where a suitable concrete or asphalt base already exists, the surface is cleaned methodically to remove moss, dust and contamination before priming. This step helps the resin bond fully and reduces the risk of localised failures.

A well prepared overlay can refresh a tired looking area without the disruption of a full dig out, provided that the base is sound and drainage is appropriate. Any concerns about suitability can be raised during the resin surfacing FAQs review.

Cleaning and priming an existing base before overlay
Measured aggregates and UV stable resin mixed on site

9) Mixing & Installation

High grade dried aggregates and UV stable binders are measured in controlled batches so the resin mix remains consistent from the first barrow to the last. The blend is laid by hand in a continuous run so that the surface cures as a single, seamless plane.

Joints, manhole covers and edging lines are trowelled carefully to avoid ridges or hollows. In warm weather, timings adjust so that the resin stays workable for just the right amount of time and still locks the stone firmly once cured.

Heat day adaptation: in peak summer a large drive was laid in planned shifts beneath temporary shade to keep workability precise. The surface set cleanly and an evening garden event ran exactly as planned.

10) Hand Trowelling, Finishing & Inspection

Final hand trowelling refines the surface, removes marks and leaves a satin smooth finish with a subtle texture underfoot. Edges are sharpened neatly and any anti slip grit is added in the agreed areas, such as slopes or main approach paths.

A final inspection checks levels, falls and finish in natural light. This is the point where the new surface starts to feel like it has always belonged in front of the home rather than as a bolt on.

Hand trowel glide and clean edge reveal
Curing guidance and simple aftercare steps

11) Curing, Handover & Aftercare

Clear guidance is given on when to walk across the surface and when to introduce light or heavier vehicles. Simple care routines help protect the finish, reduce staining and keep the surface looking fresh.

The resin care and maintenance guide explains how to brush, wash and spot clean the surface without damaging the resin. For deeper cleaning across driveways, patios and paths, professional exterior support is available through Cherry Cleans.

12) Follow Up & Email Updates

Email updates mark each stage, from planning and ordering through to installation day and final sign off. This gives a simple record that can be referred back to later if questions arise about timings, products or care.

Many homeowners keep these emails alongside documents from the homeowner resources section as a handy pack of reference notes for the property file.

Milestone emails and project tracking
Annual draw for a year of free surfacing maintenance

13) Client Appreciation & Annual Draw

Every verified review submitted to Trustpilot is entered into an annual draw for a year of complimentary resin surfacing maintenance. It is a simple thank you for sharing an experience that can guide future homeowners.

Reading those reviews on the Cherry Home Improvements reviews page is a helpful way to understand how the Hampshire Resin Method feels from a customer point of view, not just from a technical angle.

Why resin bound often beats the usual suspects

  • Concrete or tarmac: fewer visible cracks, a richer appearance and, with the right base, a more considered approach to surface water.
  • Block paving: no shifting joints or weed friendly gaps, with a blended mosaic look that still feels calm and tidy at the front of the home.
  • Resin bonded: not a sprinkle and stick finish, resin bound mixes stone and resin fully first for a smooth, permeable, stone locked surface.

Ready to feel that first barefoot step

Choose a design assessment to move forward or start with a sample pack and compare blends at home in natural light.

Soft touch resin surfacing for sensitive toes

Resin Installation Process – FAQs

What happens before resin is installed?

Before any resin installation process begins, the existing surface is assessed to confirm whether it can support a resin-bound system. This includes checking levels, drainage, substrate stability and the condition of any previous surfacing.
Examples of how base conditions influence resin driveway installations can be seen in the Driveways & Entrances section.
Preparation methods for resin patios and resin pathways are shown in Patios & Pathways.
Pool-side base requirements for slip-resistant resin finishes are demonstrated in Pool & Garden Spaces.

How long does the resin installation process take?

A typical resin installation process runs across one to two days, depending on surface size, curing time and the complexity of the base build.
Most of our premium clients have larger surfacing requirements, which can take up to a week to dig out, prepare, and install.
Larger areas with unforeseen issues, uneven substrates or sites requiring drainage corrections will take longer.
A clear breakdown of timings and installation stages is detailed on The Homeowner Resources page, where you can download manufacturer-specific data sheets and application methods.

Learn more about resin-bound surfacing standards from the British Board of Agrément, who certify resin materials across the UK.

Does the weather affect installation?

Weather conditions play a major role in the resin installation process because resin bound systems need dry, stable temperatures for correct curing. Moisture can disrupt bonding, and low temperatures can extend curing time or create surface variation.
Seasonal examples of resin installations completed under the right conditions are shown in the HQ Project Gallery.

What makes a resin installation last longer?

Long-lasting results come from a solid resin installation process that includes correct base preparation, proper resin-to-aggregate ratios, even spreading, and controlled curing. Surfaces fail most often where the base is weak, uneven or incorrectly compacted.
You can read a full explanation of the installation stages and quality checks at your leisure by downloading The Hampshire Resin Method InstaBrochure™ here...
Technical information about resin materials and performance is outlined in the Vuba Resin Surfacing Method section.

Can existing surfaces be used as a base?

Some existing driveways, patios and pathways can be overlaid if they meet the structural requirements of a resin-bound system. The resin installation process relies on a firm, crack-free base, so unstable or crumbling surfaces must be repaired or replaced.
Examples of resin overlays and full base rebuilds are shown in the Case Studies section.

How does the resin installation process differ between driveways, patios and pathways?

The resin installation process follows the same core stages, but each area of a property has different practical demands. Driveways need a reinforced base to support vehicle weight, while patios and pathways benefit from finer levelling to create a smoother, more comfortable finish underfoot. Drainage requirements also vary, especially in shaded or heavy-use areas. Understanding how the resin installation process adapts across different parts of the home helps homeowners compare options confidently and plan for long-term performance.

See examples for driveways here:

Explore patios and pathways here:

View poolside and garden layouts here:

Why is the installation process so important?

A resin surface is only as strong as the installation process behind it. Correct base preparation, measured mixing, controlled application, and consistent finishing prevent issues such as lifting, cracking or colour changes. A precise resin installation process also helps reduce long-term maintenance, improves colour consistency and gives each finished area a dependable structure that performs well throughout the year.
Additional guidance on quality, durability, and surface performance is available in the FAQ & Expert Answers.
Maintenance advice for long-term resin surface performance appears in the Homeowner Resources library.

Where can I find Hampshire-specific FAQs?

A dedicated set of Hampshire-focused questions, including regional installation considerations and aftercare tips, is available in Hampshire FAQs.
Further advice on caring for new resin driveways, patios and pathways is provided in the Care & Maintenance Guide.

The Driveway Glow

Smooth, seamless, and made to last through every British season.

Garden Zone Style

Define dining, relaxing or entertaining in true low-maintenance charm.

Pathways with Flow

Beautifully edged and sure-footed, guiding every step with quiet confidence.

Pool & Spa Perfection

Naturally slip-resistant and dry underfoot thanks to the porous finish.